Kul Kuls Reinvented
Kul Kuls Reinvented
Lydia Shemain
If you're an Anglo Indian, Christian, Goan, East Indian or Manglorian, you probably are very familiar with Kul Kuls. They are made as a Christmas treat, made at Christmas time ONLY. Every household there participated in the ritual of making Kul Kuls. In my childhood, it was tedious and time consuming but a wonderful opportunity to socialize with our neighbours and friends. Everyone would gather around the table and help roll these tiny shell like creations. We'd tell stories of Christmas's gone by. A funny name isn't it "KUL KUL!!" This was my Mum's interpretation of its origin to us as kids; "Kul" means tomorrow in Hindi (pronounced as Cull). That is why they are called "Kul Kuls", meaning going on and on until tomorrow and tomorrow. I have never forgotten this story my Mum made up.
Shaping the Kul-Kuls the traditional way is quite tedious. Thanks to a chef I once watched demonstrating how to make Gnocchi (a type of pasta), I was able to improve on my Kul Kul making and adopt his principles. This is a faster and more efficient method than our old fashioned way of rolling the dough into tiny little balls etc., which took forever. Traditionally, Kul Kuls are deep fried. I decided to re-invent them by baking them. This is for two reasons: 1. For health reasons; I try and steer clear of fried foods as much as possible, and where possible, I try to convert my recipes to a baked version. 2. The egg and coconut milk in the dough makes the oil froth during frying. So there is a risk of fire in the kitchen here. The houses here in Canada are not like the brick and mortar or stone houses in India. Please note: 1 Canadian cup equals 8 oz. or 250 gm. Makes 2 trays full.
Ingredients
Dry Ingredients
5 Canadian cups (40 oz. or 1.25 kg.) cake and pastry flour*
1 cup fine semolina (sooji)
1 tbsp. baking powder
1 tsp. level salt
1/4 cup fine sugar (if you have no intentions of frosting the Kul Kuls later, you may wish to increase the sugar to 1/2 cup here
*Cake flour: place 2 level tablespoons of corn-starch/flour in a measuring cup (an 8 oz. cup) and fill it up to level with plain flour/all-purpose flour (maida). Mix well.
To be added to the dry ingredients per instructions below:
5 oz. cold butter cut into small cubes (if the coconut milk you are using is thick and rich use 4 oz. only of butter)
1 1/2 cups coconut milk (separated into 1 cup and 1/2 cup)
2 whole eggs plus 1 yolk
For baking
2 tbsp. or 30 gm. or 1 oz. or butter
For frosting
1/2 cup sugar (8 oz. cup)
1/4 cup of water
Instructions
Sift together the dry ingredients.
Add the butter to the dry ingredients. Using the dough hook of a mixer or your fingertips, mix the ingredients to resemble coarse meal or breadcrumbs.
Warm 1 cup of coconut milk slightly (reason: helps to soften the semolina).
Add it to the flour/butter mixture. Knead for a couple of seconds using the dough hook or your hand.
Beat the eggs with remaining 1/2 cup of the cold coconut milk (reason: to avoid clumps of egg yolk in the dough)
Add this egg and coconut milk mixture to the dough and continue to knead until you have a soft dough.
Cover the dough with a damp cloth and rest for a couple of hours -- preferably overnight. This helps to soften the semolina.
To form Kul Kuls
Turn oven on to 350°F/180°C or Gas Mark 3.
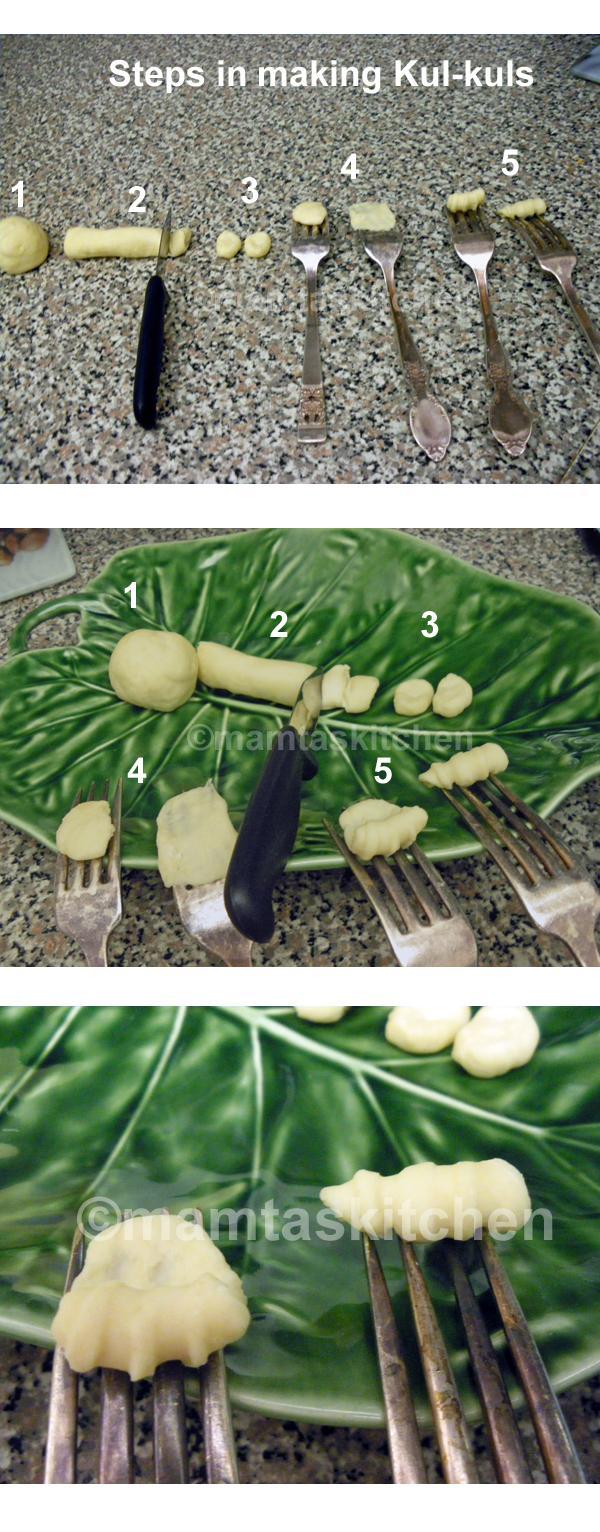
Break off ping pong size balls of dough.
Roll each ball into a cylinder the thickness of your index finger.
Cut each cylinder into about 1/2 inch thick discs.
Place the half inch disc on the back of a fork. Place your thumb on the centre of the disc, roll forward to flatten, mark with fork ridges, and elongate the disc. Keep it the width of the fork, don’t let it spread sideways, it will get too wide. See picture.
Then, roll backward to flatten the other half of the disc.
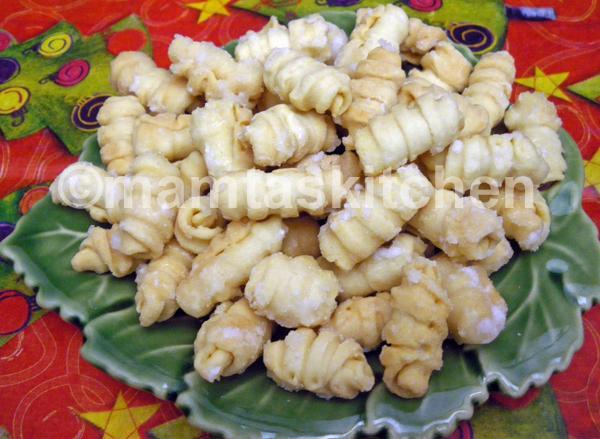
Roll the flattened, fork marked disc starting at the bottom end. Roll it tight to form a curl like a butter curl or gnocchi or shell, whatever you want to call it. See picture.
Jab the end of each Kul Kul with the fork to prevent it from opening up during baking.
Baking
Place Kul Kuls on a parchment lined baking trays.
Bake in the centre of the oven for 45 minutes (10-15 minutes less in a fan oven), turning them over or tossing the Kul Kuls once halfway.
IMPORTANT: 5 minutes before removing, add 1 tbsp. butter per tray and gently toss Kul Kuls with it. Surprisingly, it does not make them greasy but gives them a little more colour.
Cool completely before frosting and that's optional. You may leave them as is or frost them as described below.
Making Syrup and Frosting
In a heavy pan (like a pressure cooker pan), place 1/2 cup sugar and 1/4 cup of water and bring to boil on high heat. Boil till sugar dissolves and Sugar Syrup is bubbly and frothy.
1st stage: The syrup is transparent and sticky. 2nd stage:The syrup is bubbly/frothy/and whitish. When it reaches that stage, smear the sides of the pan with a little syrup. It gets powdery and sugary immediately. This shows the syrup is now ready. To confirm, drop one Kul Kul in the syrup and lift it out. The syrup should set immediately. Syrup is now ready. (Alternatively. you can make a syrup of 3 thread consistency as given here by Mamta; Sugar Syrup).
Remove pan from the hot element/cooker.
Drop all the Kul Kuls in the syrup at once. Toss lightly but quickly to coat all kul kuls. Quickly turn them out on a tray and, spread them with two forks separate them. DO NOT TRY TO DO THIS WITH YOUR BARE HANDS, KUL KULS ARE PIPING HOT, WILL GIVE YOU A 3RD DEGREE BURN!
GOOD LUCK. I hope they turn out well, and I am confident they will.
Notes
Don't substitute cake and pastry flour with all purpose flour, otherwise the results aren't comparable. Also, amount of butter may have to be adjusted depending on the coconut milk, how thick or how rich it is.
